Frequently Asked Questions

Host

Host – General

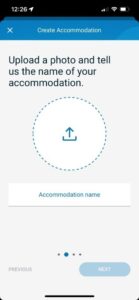
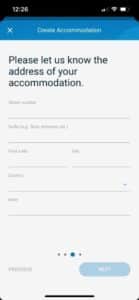
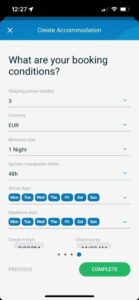
DiBooq for Hosts is an all-in-one software solution designed to simplify the management of your vacation rental or vacation home.

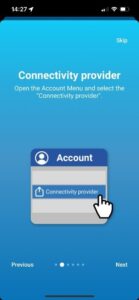
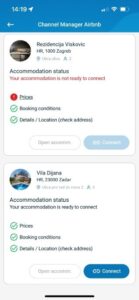
Our user-friendly app helps you streamline tasks and operate more efficiently, offering features like the DiBooq Channel Manager and the DiBooq Booking Website to effectively market your property.

Enjoy a 14-day free trial of all features, no credit card required!

The primary difference lies in the scale of management and the features offered:

DiBooq for Property Managers

This version is designed for individuals or businesses managing multiple properties or operating a vacation rental business at scale. It includes advanced tools to optimize operations, attract new hosts, and maximize bookings while minimizing administrative effort. Key features include:

  • DiBooq Channel Manager: Synchronize calendars and prices across major platforms like Airbnb, Booking.com, and Vrbo.
  • DiBooq Booking Website: Promote properties and attract direct bookings.
  • Host/Owner Acquisition Tool: Expand and manage your portfolio efficiently.

DiBooq for Hosts

This version is tailored for individual property hosts who want a simple yet effective way to manage and market their vacation rental. It offers a user-friendly interface to handle bookings, calendars, and marketing with ease.

Additional Note:

The mobile app provides separate interfaces for friends, family members, regular guests, and property managers. Hosts can invite property managers directly, ensuring smooth collaboration and access management for everyone involved.

DiBooq is currently available in seven languages:

  • English
  • Spanish
  • German
  • Croatian
  • French
  • Portuguese
  • Italian

We are continually working to make more languages available in the future.

The DiBooq App for Hosts offers a variety of powerful features to simplify property management and enhance guest experiences:

  • Channel Manager: Synchronize calendars and prices across major platforms.
  • Property Management App: Streamline operations for vacation rentals.
  • Price Synchronization: Ensure consistent pricing across all connected platforms.
  • Own Booking Website: Promote and manage direct bookings.
  • Guest App: Provide a seamless experience for guests.
  • No Booking Fee: Save on commissions and fees.
  • 14-Day Free Trial: Try all features without the need for a credit card.

The basic features include:

  • Reservation System (PMS)
  • Property Manager Channels
  • Create 1 accommodation
  • Guest App (2 contacts)
  • E-Mail Support
  • Onboarding

Premium features include:

All Basic features, plus:

  • Channel Manager
  • ICal Export
  • Price synchronization
  • Booking Website
  • Any number of accommodations
  • Guest app (as many contacts as you like)
  • Phone Support

To ensure you receive push notifications from DiBooq, follow these steps:

  • Check Phone Settings:
    1. Go to your phone’s Settings.
    2. Locate the DiBooq app and ensure that Push Notifications are enabled.
  • Verify App Settings:
    1. Open the DiBooq app.
    2. Navigate to Profile SettingsNotifications.
    3. Confirm that the option to receive push notifications is activated.

By enabling these settings, you’ll stay updated with all important alerts and notifications from DiBooq.

Host – Accommodation

To connect your properties with the Channel Manager, you first need to set up your accommodation:

  • Go to Profile → Property management
  • Tap the house symbol located in the bottom-right corner.
  • A new window will open.
  • Enter all necessary property details to complete the setup.

Once your accommodation is set up, you can proceed with connecting it to the Channel Manager.

Yes, you can update the booking terms for your accommodation at any time.

To make changes:

  • Go to your Profile → Property Management.
  • Select the property for which you want to edit the booking terms.
  • Under Booking Terms, you can adjust the following:
    1. Sleeping places (adults): Update the number of guests your property can accommodate.
    2. Currency: Set or change the currency for your property.
    3. Minimum Stay: Specify the minimum number of nights required for a booking.
    4. Options changeable within: Choose between 48 or 72 hours for how long you can take to accept a guest reservation via the Guest App or Booking Website.
    5. Arrival Days: Specify the allowed days for check-in.
    6. Departure Days: Specify the allowed days for check-out.
    7. Check-in and Check-out Time: Define the timeframe for guest arrivals and departures.

Once updated, these changes will take effect immediately and reflect on your booking website and Guest App.

The setting “Option changeable within” defines the duration for which an Occupancy with type “Option” remains active before it is automatically canceled. (see also occupany type “Option”)

Options are converted based on their origin:

  • By the host, if they created the Option directly in the DiBooq app for hosts.
  • By the property manager, if it was entered into the owner’s calendar via the agency PMS.
  • By the vacation guest, if they submitted a request via the DiBooq Tenant app and the host created a price proposal (equivalent to an Option) from it.

To delete a property in DiBooq, follow these steps:

  • Go to Profile → Property Management.
  • Locate the property you want to delete.
  • Slide the property to the left.
  • Tap the Delete button that appears.

Important Notes:

  • The calendar must not contain any future bookings.
  • If the property has future bookings, these bookings need to be deleted first before you can delete the property.

This ensures that the property can be removed without affecting any active reservations.

Host – Channel Manager

A Channel Manager is a software tool that allows property hosts and managers to efficiently manage their listings on platforms like Airbnb, Booking.com, and Vrbo.

Key benefits include:

  • Centralized Management: Simplify the handling of availability, pricing, and reservations across multiple platforms.
  • Real-Time Synchronization: Keep all listings updated simultaneously to avoid discrepancies.
  • Avoid Double Bookings: Ensure availability is consistent across all platforms.
  • Consistent Pricing: Maintain uniform pricing strategies across channels.

The Channel Manager streamlines property management, saves time, and helps maximize bookings while minimizing administrative effort.

To connect your property with the channel manager, ensure that the following information is completed in your app:

  • Details/Location
  • Booking conditions
  • Prices

Once this information is provided, you can proceed with the connection process to ensure seamless synchronization across all platforms.

To successfully connect your property on DiBooq to Booking.com, please follow these steps:

  1. Ensure you have an active Booking.com account:
    • A valid Booking.com account is required to establish the connection.
  2. Select the property:
    • Choose the property you want to connect.
  3. Log in to your Booking.com Extranet account.
  4. Navigate to Connectivity Provider:
    • Go to the Account section and choose Connectivity Provider from the dropdown menu.
  5. Find and select the provider:
    • Click on Search to find a new connectivity provider.
    • Select io from the list of available providers.
  6. Confirm the connection:
    • Follow the instructions to confirm the connection with Channex.io.
  7. Complete the connection in DiBooq:
    • Once the connection is confirmed, enter the Property ID (visible in the top left corner of your Booking.com Extranet account) in the DiBooq app to finalize the connection.

IMPORTANT NOTES:

Before the connection can work, ensure all required fields are completed on Booking.com:

  • Prices
  • Booking conditions
  • Details/Location
  • Active listing

Note:

Only complete accommodation can be connected to the DiBooq Channel Manager. It is not possible to synchronize several rooms within one property.

The Booking.com Pulse app does not support connections to a Channel Manager. To successfully connect your property to the Channel Manager, you need to access the Booking.com Extranet via a web browser.

No, the Booking.com Pulse app does not support connections to a Channel Manager. To successfully connect your property to the Channel Manager, you need to access the Booking.com Extranet via your web browser.

In Booking.com, you can create multiple rooms within a single house. However, registering two different houses under the same accommodation number is not recommended.

If you manage two apartments or units in one house, they can only be supported in the DiBooq Channel Manager if they are created as separate units.

Hint:

  • Two different houses should be registered separately on Booking.com.
  • Two apartments or multiple rooms in one house can be either combined or created separately in Booking.com. However, note that the summarized option is not compatible with all channel managers, including DiBooq.

Recommendation:

In DiBooq, each housing unit (e.g., each room or apartment) should be created as separate accommodation.

To successfully connect your property on DiBooq to Airbnb, please follow these steps:

  1. Ensure you have an active Airbnb account:
    • A valid Airbnb account is required to establish the connection.
    • Your accommodation must already be listed on Airbnb, and the listing must be active
  2. Select the property:
    • In the DiBooq App go to ProfileàChannel ManageràAirbnb
    • Choose the property you want to connect to.
  3. Log in to your Airbnb account:
    • Select your preferred login method (e.g., email, Google, Facebook, etc.) and sign in.
  4. Follow the instructions:
    • Complete the steps provided in the DiBooq app to establish the connection. You will be asked to Connect Airbnb to Channex. Scroll down and klick on “Allow”
    • Select the airbnb listing you want to connect with

IMPORTANT NOTES:

Before the connection can work, ensure all required fields are completed in DiBooq:

  • Prices
  • Booking conditions
  • Details/Location

Required in Airbnb:

  • Completed profile information (including contact information and a profile picture)
  • Minimum 1 active listing

Note:

Only complete accommodation can be contacted by the DiBooq Channel Manager. It is not possible to synchronize several rooms within one property.

If you don’t have any properties set up in DiBooq, you’ll need to create one before connecting to the Channel Manager:

  • Tap the house icon located in the bottom-right corner of the app.
  • A new window will open.
  • Enter all required property details (e.g., name, location, amenities).
  • Save your changes to complete the setup.

Once your property is created, you can connect it to the Channel Manager for seamless management.

For more information, read our article: How do I create accommodation?

DiBooq’s Channel Manager ensures seamless synchronization of key property details across platforms like Airbnb and Booking.com (with Vrbo integration coming soon).

The following information is synchronized:

  • Rates and Prices: Keep pricing consistent across platforms.
  • Calendars: Availability updates in real-time to prevent double bookings.
  • Bookings: Reservations are automatically reflected in the calendar.

This synchronization optimizes occupancy and minimizes administrative effort by ensuring accurate and consistent information across all connected platforms.

You can update prices by following these steps:

  • Go to Profile.
  • Select Property Management.
  • Choose the property you want to update.
  • Navigate to Prices, where you can modify overnight prices, rates for additional services, seasonal pricing for up to two years in advance, and the base price, which includes the nightly rate and any additional charges for weekend stays. In this page you can also create a seasonal period by clicking on the “+”.

Yes, you can update the percentage increase for your Channel Manager by following these steps:

  • Go to the Channel Manager in your DiBooq app.
  • Select the desired channel (e.g., Airbnb, Booking.com).
  • Open the specific accommodation where you want to apply the update.
  • Enter the new percentage increase (%) for the pricing.
  • Save the changes to apply the update.

These changes will be synchronized across the selected channel immediately.

You can manage pricing for your properties with the following options:

  • Overnight Prices: Set both base prices and seasonal rates to align with demand.
  • Additional Service Prices: Customize charges for extra services, such as cleaning or extra guests. Additional Services are required only for the Booking Website!

Important:

Once your account is connected to the Channel Manager, it’s highly recommended to make all pricing updates through the DiBooq app. This ensures seamless synchronization across all booking platforms and prevents discrepancies.

You can add additional service prices by following these steps:

  • Go to Profile.
  • Select Property Management.
  • Choose the property you want to update.
  • On the Prices page, you will find the Additional Services section at the top.
  • Here, you can navigate through the existing services, edit their prices or delete them.

To create a new service, click the “+” button, select from the available additional services, and set your price. It’s important to note that in this field, you can also specify whether the service is optional or not.

(Important: The final cleaning is a mandatory service when it is created.)

For more information, read our article: What additional services can be optional on the booking website?

Host – Guest App

The DiBooq Guest App allows property owners to easily invite guests, share their real-time occupancy calendar, and receive direct bookings—all within the app. Owners are notified via push notifications when a guest makes a booking or requests a temporary reservation.

Key Features of the DiBooq Guest App:

  • Invite Contacts: Share calendars and receive bookings directly through the app.
  • Commission-Free Bookings: Generate more direct bookings without paying extra fees.
  • Perfect for Friends and Family: Allow close contacts to book easily with personalized options.
  • Special Prices: Offer exclusive rates to regular customers.
  • Integration with Sales Channels: Connect with Stripe and receive payments directly from guests.


Additionally, owners can switch to their Guest Account if they have been invited as a guest by another host.

With the basic version, you can invite up to 2 contacts, while the premium version allows you to invite an unlimited number of contacts.

The Host can, by clicking on the + symbol in the bottom-right corner, invite new contacts:

  • Property Manager– to the Web Browser
  • Guests to the Guest App

The Host needs to:

  1. Enter the E-Mail Address
  2. Fill Out Contact Information:
    • First & Last Name
    • Preferred Language
  3. Assign Properties
    • Select the properties you want to share access to.
  4. Confirmation Status

Once the invite is accepted, the gray link icon will turn blue, indicating a successful connection.

The Guest receives an email or app notification with an invitation to access the accommodation. The message includes details about the property and a clear call-to-action:

“You have been invited to access [Accommodation Name]. Please accept this invitation to view details, check availability, and book your stay.”

Action Required: The Guest needs to accept the invitation to gain access to the accommodation and proceed with booking their reservation.

You can also watch our video on How to invite contacts?

To book a reservation using the Guest App, the guest should follow these steps:

  • Tap the blue calendar symbol located in the bottom-right corner of the app.
  • Select the available dates they wish to book.
  • Submit a booking request for the selected dates.
  • The Host will review the request and provide a price proposal (= Option) for the reservation.
  • The guest confirms the price proposal in their Guest app within the Option time frame.

The Host has either 48 hours to confirm the request and send the price propsal.

Once the price proposal is confirmed, the booking will be finalized. The host and the guest will receive notifications.

If the Guest does not accept the reservation within this specified time frame, the chosen dates will automatically become available for other guests to book.

Once a guest books a reservation, the host has 48 or 72 hours (depending on the booking terms) to accept it. While reviewing the request, the host must:

  • Add the price for the booking.
  • Select the preferred payment method.

DiBooq offers the following payment methods:

  • Online via Stripe: Guests can make secure payments directly through the Guest App. Both hosts and guests can connect their accounts to Stripe, enabling smooth and seamless transactions. You can also watch our video on how to get started with Stripe payments: Get Stripe Payments and Set up Stripe.
  • Independent Processing: Hosts can choose to manage payments independently, outside the app.

This flexibility allows hosts to decide the most suitable payment method for their guests.

To disconnect your existing Stripe account:

  • Go to Connection Payment Provider in your account settings.
  • Click on Disconnect from Stripe.

This will remove the connection between your Stripe account and your DiBooq profile.

Your contacts can only view booking details that are relevant to them:

  • Regular guests will only see information about the bookings they made through DiBooq. They will not have access to prices, names, or notes of other bookings.
  • Friends and family members, as well as regular guests, cannot see the type of booking (e.g., self-occupancy, unavailable period, option, or booking).

This ensures that sensitive information is only visible to the appropriate individuals.

The Host can, by clicking on the + symbol in the bottom-right corner, invite new contacts:

  • Property Manager– to the Web Browser
  • Guests to the Guest App

The Host needs to:

  1. Enter the E-Mail Address
  2. Fill Out Contact Information:
    • Agency Name
    • Preferred Language
  3. Assign Properties
    • Select the properties you want to share access to.
  4. Confirmation Status

Once the invite is accepted, the gray link icon will turn blue, indicating a successful connection.

IMPORTANT: The property manager can use the web version for free and book reservations for the owners.

The Agency receives an email with an invitation to access the accommodation. The message includes details about the property and a clear call-to-action:

“You have been invited to access [Accommodation Name]. Please sign up to view details, check availability, and book.”

Action Required: The Agency needs to sign up to get access to the accommodation and proceed with booking their reservation.

You can also watch our video on How to invite contacts?

As a Host, you have the option to decide whether agencies can book directly or if bookings require your confirmation.

  • If direct booking is enabled, property managers can book without needing your approval.
  • If direct booking is disabled, you will receive a notification in the News section prompting you to confirm the booking.

To manage this setting:

  • Go to Contacts in the app.
  • Select the property manager you want to adjust the settings for.
  • Navigate to Calendar Access and toggle the option for Allow Direct Bookings.

These notifications ensure you’re always informed about booking activity, regardless of the setting you choose.

Host – Booking Website

A booking website is a personalized online platform that allows property owners to showcase their vacation rentals and enable guests to book their accommodations directly. It’s a professional interface for these property owners to increase their reservations and receive direct bookings gaining visibility and reach more guests providing a seamless booking experience to them.

The DiBooq booking website offers:

  • Property Showcase – high-quality photos, detailed descriptions and pricing of the property.
  • Real-Time Availability – guests can check when the property is available to book.
  • Transparent Pricing and Conditions
  • Easy Booking Process – guests can book directly with just a few clicks and the guest receive the immediate booking confirmation for approval on the DiBooq Owner App.
  • More professional presentation

The DiBooq booking website is quick and simple way to allow property owners to establish their online presence in minutes.

You can create your website by following these steps:

  1. Go to Profile:
    • Click on Property Management.
    • Select the property you want to create a website for.
  2. Complete Required Fields:
    Ensure the following details are filled out in the app:

    • Details/Location
    • Booking Conditions
    • Prices
    • Amenities
    • Languages (we recommend adding at least two)
    • Headline and Description
    • Cover Photo
    • At least seven high-quality images showcasing your property.
  3. Navigate to Your Booking Website Section:
    • Scroll down until you see “Your Booking Website”.
    • Review the checklist under Website Status and Language Version:
      • Items in green are complete.
      • Items in red require your attention.
    • Customize Your Website:
      • Color Scheme: Choose the primary color for your website.
      • Subdomain: Enter a meaningful name for your booking website in the Subdomain Section (Important: The subdomain cannot be changed later).
    • Add Privacy/Terms and Conditions:
      • Complete the Privacy Policy, Terms and Conditions, Terms of Payment, and Cancellation Policy
      • You can use the default text provided or write your own.
      • These fields must be completed for each selected language.
      • Important: Terms and Conditions and Deposit are optional.
    • Activate Your Website:
      • Once all required information is completed, go to the Status Section to activate your booking website.

Important Notes:

  • The subdomain name cannot be changed after setup.
  • High-quality visuals and a clear description help attract more bookings.

You can also watch our video on How to create a booking website?

To successfully create a booking website, ensure that the following information is completed in your app:

  • Details/Location
  • Booking conditions
  • Prices
  • Amenities
  • Languages
  • Headline & Description
  • Cover photo & image gallery
    • At least 7 high-quality images showcasing the property.

No, once you define your subdomain in the app, it cannot be changed. Please ensure you choose a meaningful and appropriate subdomain name when setting it up.

Yes, you can update the payment conditions at any time. Once the changes are saved, the updates will appear immediately on your booking website.

Here’s how to make changes:

  • Go to your Profile.
  • Select Property Management.
  • Choose the relevant accommodation.
  • Scroll down to the Payments/Cancellations/Deposit

You can either:

  • Use the default text provided.
  • Clear the existing text and enter your own customized information.

The updates will be reflected on your booking website in real time.

Yes, you can update the cancellation policy at any time. Once the changes are saved, the updates will appear immediately on your booking website.

Here’s how to make changes:

  • Go to your Profile.
  • Select Property Management.
  • Choose the relevant accommodation.
  • Scroll down to the Payments/Cancellations/Deposit

You can either:

  • Use the default text provided.
  • Clear the existing text and enter your own customized information.

The updates will be reflected on your booking website in real time.

Yes, you can update the deposit at any time. Once the changes are saved, the updates will appear immediately on your booking website.

Here’s how to make changes:

  • Go to your Profile.
  • Select Property Management.
  • Choose the relevant accommodation.
  • Scroll down to the Payments/Cancellations/Deposit

You can either:

  • Use the default text provided.
  • Clear the existing text and enter your own customized information.

The updates will be reflected on your booking website in real time.

Yes, you can update the privacy policy at any time. Once the changes are saved, the updates will appear immediately on your booking website.

Here’s how to make changes:

  • Go to your Profile.
  • Select Property Management.
  • Choose the relevant accommodation.
  • Scroll down to the Privacy/Terms and Conditions

You can either:

  • Use the default text provided.
  • Clear the existing text and enter your own customized information.

The updates will be reflected on your booking website in real time.

Yes, you can update the terms and conditions at any time. Once the changes are saved, the updates will appear immediately on your booking website.

Here’s how to make changes:

  • Go to your Profile.
  • Select Property Management.
  • Choose the relevant accommodation.
  • Scroll down to the Privacy/Terms and Conditions

You can either:

  • Use the default text provided.
  • Clear the existing text and enter your own customized information.

The updates will be reflected on your booking website in real time.

The following policy pages are mandatory for creating a booking website:

  • Privacy Policy
  • Terms of Payment
  • Cancellation Policy

These pages must be completed for each selected language to ensure compliance and clarity for your guests.

Optional Policies:

  • Terms and Conditions
  • Deposit Policy

You can use the default text provided in the app or customize these policies according to your preferences.

Your booking website includes a variety of features designed to help you showcase your property and streamline the booking process:

  1. Custom Subdomain
    • Create a personalized subdomain for your website (e.g., yourproperty.dibooq.com).
  2. Multilingual Support
    • Add multiple language versions to cater to international guests.
  3. High-Quality Property Showcase
    • Display a cover photo and at least seven high-resolution images of your property.
  4. Property Details
    • Include descriptions, headlines, amenities, and location details to attract potential guests.
  5. Availability and Pricing
    • Showcase your property’s calendar with updated availability and pricing.
  6. Online Booking
    • Allow guests to book directly through your website, reducing dependency on third-party platforms.
  7. Customizable Color Scheme
    • Choose a color theme that matches your brand or property’s personality.
  8. Policy Pages
    • Add essential pages like Privacy Policy, Terms of Payment, Cancellation Policy, and optional Terms and Conditions.
  9. Integration with DiBooq Tools
    • Manage your bookings, calendars, and guest communication seamlessly through the DiBooq app.

Yes, you can update your amenities even after your booking website is live.

Here’s how to make changes:

  • Log in to your DiBooq app.
  • Go to Property Management.
  • Select the relevant property.
  • Navigate to the Amenities
  • Make the necessary updates and save the changes.

The changes will be reflected on your booking website immediately.

To add additional languages to your booking website, follow these steps:

  • Log in to your DiBooq app.
  • Go to Profile > Property Management.
  • Select the property you want to update.
  • Navigate to the Languages
  • Choose the additional languages you want to add.

Important:

  • Ensure you provide translations for key fields such as property description, amenities, terms and conditions, privacy policy, and cancellation policy for each selected language.
  • The Website Status checklist will indicate which fields still need translations.

Once all fields for the new language are completed, the additional language version will automatically appear on your booking website.

DiBooq offers several options for integrating or linking your existing booking website to enhance its functionality:

  1. Complete Booking Website via DiBooq:
    • You can create a complete booking website through DiBooq, which includes direct booking features and seamless integration with the platform.
  2. Using Your Existing Website:
    • If you wish to continue using your current website, you can link it to our Owner Booking Interface.
    • Add a button or menu item on your website to direct guests to a DiBooq-managed booking page.
  3. iCal Synchronization:
    • Synchronize your availability with iCal using any compatible calendar plugin on your website.
    • Important Note: Bookings made through your website will not automatically sync with DiBooq. These bookings must be manually added to the app.

After a guest books a reservation, the host has 48 or 72 hours (depending on the booking terms) to accept it.

Once the host confirms the reservation, the host and guest must coordinate directly to decide on the payment method. Options may include:

  • Credit Card
  • Cash
  • Other mutually agreed-upon methods.

This ensures flexibility for both the host and the guest in completing the transaction.

For the Guest:

  • The guest will receive a confirmation email acknowledging the reservation request.
  • The email will state that the reservation is pending approval from the host.
  • If any changes or corrections are needed, the guest will have access to the host’s contact information to get in touch.

For the Host:

  • The host will receive a push notification to access the app and review the reservation.
  • The reservation request will also appear in the News – To Do’s section of the app.
  • Additionally, the host will receive an email notification about the request, including the time frame within which they need to confirm the booking.

Adjustable Confirmation Window:

After Confirmation:

  • Once the host approves the reservation, both the host and the guest will receive a confirmation email.
  • They can then reach out to each other to arrange payment details.

To update prices on your booking website, follow these steps:

  • Log in to your DiBooq app.
  • Go to ProfileProperty Management.
  • Select the property for which you want to update the prices.
  • Navigate to the Prices
  • Update the relevant pricing details, such as:
    1. Overnight Prices
    2. Additional Services (e.g., cleaning fees, extra guest charges)
  • Save your changes.

The updated prices will be reflected on your booking website immediately.

You can update or change any price displayed on your booking website, including overnight rates and additional services.

To update prices, follow these steps:

  • Log in to your DiBooq app.
  • Go to Profile → Property Management.
  • Select the property for which you want to update the prices.
  • Navigate to the Prices
  • Update the relevant pricing details, such as:
    1. Overnight Prices
    2. Additional Services (e.g., cleaning fees, extra guest charges)
  • Save your changes.

The updated prices will be instantly reflected on your booking website.

The only mandatory additional service for the booking website is “Final Cleaning”. Once activated, it will automatically appear on the final price on your booking website.

To update prices on your booking website, follow these steps:

  • Log in to your DiBooq app.
  • Go to Profile > Property Management.
  • Select the property for which you want to change the prices.
  • Navigate to the Prices
  • Update or create additional services.
  • Save your changes.

The updated prices will be reflected on your booking website at once.

The following additional services can be activated as optional on the booking website, allowing guests to customize their stay:

  1. Additional Guest Charges:
    • Per booking (above the included number of guests).
    • Per day (above the included number of guests).
  2. Cleaning Services:
    • Intermediate cleaning every [X] days.
    • Change of bed linen and towels every [X] days.
  3. Child-Friendly Amenities:
    • Baby crib.
    • High chair for kids.
  4. Parking Space

To add or update these services on your booking website, follow these steps:

  • Log in to your DiBooq app.
  • Go to Profile > Property Management.
  • Select the property for which you want to manage additional services.
  • Navigate to the Prices
  • Update or create additional services and mark them as optional.
  • Save your changes.

The optional services will immediately appear on your booking website and allow guests to select them during the booking process.

Host – Calendar

You can easily invite guests to have access to your booking calendar follow this steps:

  1. Enter the Guest E-Mail Address
  2. Fill Out Contact Information:
    • First & Last Name
    • Preferred Language
  3. Assign Properties
  4. Select the properties you want to share access to.

Confirmation Status

Once the invite is accepted, the gray link icon will turn blue, indicating a successful connection.

The Guest receives an email or app notification with an invitation to access the accommodation. The message includes details about the property and a clear call-to-action:

“You have been invited to access [Accommodation Name]. Please accept this invitation to view details, check availability, and book your stay.”

Action Required:

The Guest needs to accept the invitation to gain access to the accommodation and proceed with booking their reservation.

The calendar offers the following occupancy options:

  • Option: Temporarily block a period. If not converted into a booking within the option time, it will auto-release.
  • Booking: Standard reservations for guests.
  • Owner Occupancy: Reserved for personal use, blocking guest bookings.
  • Not Available: Mark dates for renovations, maintenance, or other closures.

You can also watch our video on How to create bookings?

If you are a host, blocked days in your calendar usually appear due to the following reasons:

  1. Minimum Stay Requirement:
    • If you have set a minimum stay (e.g., 2 nights), days that don’t meet this requirement will appear as blocked for arrivals. For example:
      • If the owner’s occupancy starts on 18.02. and the minimum stay is 2 days, the 17.02. will appear blocked. However, guests can still book from 16.02. to 18.02..
  2. Owner Occupancy:
    • Days the host has manually marked as occupied or unavailable will also appear as blocked.
  3. Booking:
    • If your property is connected to Airbnb, Booking.com or Vrbo, the blocked days could result from existing reservations or calendar synchronization settings.
  4. Not available :
    • If the host marked this period as not available due to renovations, maintenance or other closures.
  5. Option:
    • Period is temporarily blocked, and it will auto-release if not converted in Booking within the option time.

To check or adjust your settings, review the minimum stay rules and calendar blocks in the app.

Yes, you can view the annual overview by clicking on the calendar symbol in the top-left corner. This feature provides a broader perspective of your reservations and occupancies throughout the year.

Host – Billing and Subscription

DiBooq offers flexible subscription plans tailored for both vacation rental owners. The pricing depends on the number of properties you manage.

Key Details:

  • Free Trial: Start with a 14-day free trial to explore all features.
  • Subscription Options:
    1. Monthly Plan: Ideal for short-term commitment.
    2. Semi-Annual Plan: Cost-effective for mid-term usage.
    3. Annual Plan: Best value for long-term management.

For more details, please visit: Plans for Hosts.

DiBooq subscriptions are managed through the Apple or Google App Store account, depending on whether an iPhone or Android device is used.

If the subscription is to be canceled, this can be easily done via the respective App Store account. You can find the detailed steps in the links below:

Please note that the subscription will remain active until the end of the current billing cycle.

If you scroll down to the bottom of the DiBooq app under Profile, you will find the menu item “Delete account”.

If deletion is not possible for any reason (for example, because you can no longer log into the app), contact us at support@dibooq.com to request manual deletion of the account.
Please note that with the deletion of the DiBooq account, all information that you have entered in DiBooq will also be permanently deleted. It is not possible to restore the information.

Yes, you have a 14-day free trial to test all our services included in the Premium Plan.

Basic Plan Premium Plan
Includes:

  • Reservation System (PMS)
  • Property Manager Channels
  • Receive bookings from top-selling property managers
  • 1 accommodation
  • Guests App (2 contacts)
  • E-Mail Support
  • Onboarding
All basic functions plus:

  • Channel Manager
  • Airbnb, Booking.com
  • iCal export (for further portals)
  • Rates synchronization
  • Booking website
  • ∞ Accommodations
  • Guests App (∞ Contacts)
  • Phone support
  • Onboarding

After the 14-day free trial, you can choose between the premium plans available here:

  • Plans for Owners – DiBooq provides a mobile app for property hosts, offering the management features The app version works better for hosts who manage less than 5 properties.
  • Plans for Agencies – DiBooq provides a web version for property managers/agency, offering the management features It is designed for properties or agencies that manage more than 10 or up to 1,000 vacation rentals.

After enjoying all the services DiBooq offers for 14 days, you will need to choose a premium plan to continue using the tool. You can choose between the premium plans available here:

  • Plans for Hosts – DiBooq provides a mobile app for property hosts. The app version works better for owners who manage less than 5 properties.

Yes, it is possible to log in to the same owner account on multiple devices.

Important Notes:

  • When launching the DiBooq app, it checks the App Store account (Apple ID or Google Account) to verify if a subscription purchase exists.
  • The subscription is only recognized if the device is using the same App Store account through which the subscription was purchased.

Example:

If partners use different Apple or Google IDs on their devices, only the person who made the subscription purchase via their App Store account will have access to the premium features in the DiBooq app on their device.

Property Manager

Property Manager – General

DiBooq for Property Managers is a specialized software solution designed for professional vacation rental managers who need to efficiently manage multiple properties. With DiBooq, you can:

  • Streamline operations and save time.
  • Increase bookings with targeted tools.
  • Minimize administrative effort to focus on growing your business.

For more information, visit: Property Managers.

The primary difference lies in the scale of management and the features offered:

DiBooq for Property Managers

This version is designed for individuals or businesses managing multiple properties or operating a vacation rental business at scale. It includes advanced tools to optimize operations, attract new hosts, and maximize bookings while minimizing administrative effort. Key features include:

  • DiBooq Channel Manager: Synchronize calendars and prices across major platforms like Airbnb, Booking.com, and Vrbo.
  • DiBooq Booking Website: Promote properties and attract direct bookings.
  • Host/Owner Acquisition Tool: Expand and manage your portfolio efficiently.

DiBooq for Hosts

This version is tailored for individual property hosts who want a simple yet effective way to manage and market their vacation rental. It offers a user-friendly interface to handle bookings, calendars, and marketing with ease.

Additional Note:

The mobile app provides separate interfaces for friends, family members, regular guests, and property managers. Hosts can invite property managers directly, ensuring smooth collaboration and access management for everyone involved.

The key features are:

  • Channel Manager
  • Property Management Software
  • Booking Website
  • Acquisition of new vacation rentals
  • Free product demo
  • Fair pricing model

Property Manager – Channel Manager

A channel manager is a software tool that enables property hosts and managers to efficiently manage their properties listed across to Airbnb, Booking.com and Vrbo. It centralizes the management of property data, such as availability, pricing and reservations, reducing the risk of double bookings, maintains consistent pricing and ensuring real-time synchronization across all these platforms.

Property Manager – Billing and Subscription

DiBooq offers flexible subscription plans tailored for property managers. The pricing depends on the number of properties you manage.

For more details, please visit: Plans for Property Managers.

WordPress Cookie Plugin by Real Cookie Banner